MakerScanner: Unterschied zwischen den Versionen
(Die Seite wurde neu angelegt: „{{Projekt |projectname=MakerScanner |subcat=3D-Drucker |Images={{ProjektImages |projectimage=92.1.png }} |firstin=http://www.makerscanner.com/ |desc=<div><p>Th…“) |
K |
||
| Zeile 1: | Zeile 1: | ||
{{Projekt | {{Projekt | ||
|projectname=MakerScanner | |projectname=MakerScanner | ||
| − | |subcat=3D | + | |subcat=3D printer |
|Images={{ProjektImages | |Images={{ProjektImages | ||
|projectimage=92.1.png | |projectimage=92.1.png | ||
Version vom 31. Januar 2019, 05:31 Uhr
|
|
MakerScanner Basic Data Category: 3D printer URL (first publication): http://www.makerscanner.com/
Project status:
Technical documentation Maturity of the project:
no no
Other
Assembly instructions are editable: Bill of materials is editable: Design files are in original format: No Free redistribution is allowed licence: No
Project management
Open-o-meter: 0 Product category: Hardware Contains original non-electronic hardware: Contains original electronic hardware: Contains original software: |
Description
The Scanner
The MakerScanner is a completely open source 3D-scanner and the perfect complement to a MakerBot or other 3D printer. Every one of the scanner's plastic parts can be printed on a MakerBot or other 3D printer
Head over to the (and the ) where you'll find complete documentation for the MakerScanner v0.3
Software is now .
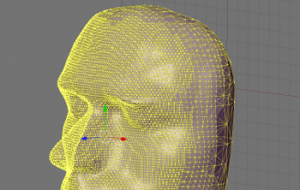
Face Scan
A scan of my face I used to clean the pointcloud and to create a surface which we then on a . If you're interested you can get the pointcloud and STL files .
Dramatic Increase in Quality
Lots more work put into the scanner and have dramatically improved quality Here's two scans of a nautilus shell combined into a single 3D pointcloud. The color information has been removed.
An Overview of How the MakerScanner works
The technique projects energy into a scene in order to perform rangefinding. The basics are similar to stereo vision. A laser pointer (scanning to make a vertical line) and a camera are offset a base distance B. As objects approach the sensor, the laser line appears closer to the edge of the camera's image. With correct calibration and some math, the range to each point can be calculated.
The following video explains the concept far better than words. Notice how the laser line moves to the left of the image when my hand approaches the camera. That's all there is to it
This technique has the distinct advantages of being cheap, fast, and accurate. There is little processing required beyond the digitization of the images, unlike a traditional stereo sensor that requires pixel correlation. By using a camera, surprising accuracy can be achieved for relatively little cost using a Logitech webcam gives +/- 1 centimeter accuracy.
I am less successful at long ranges and when scanning in environments with untrained personnel. Long ranges are difficult because often the laser will become too faint to detect. A more powerful laser solves this problem, but can become dangerous for nearby people.
+ General Reviews 
Public cad repository for non-electronic hardware
Public code repository
Assembly instructions
Bill of materials
Link github
