ShapeOko
|
|
ShapeOko Basic Data Category: Projekte URL (first publication): https://wiki.shapeoko.com/
Project status:
Technical documentation Maturity of the project:
no no
Other
Assembly instructions are editable: Bill of materials is editable: Design files are in original format: No Free redistribution is allowed licence: No
Project management
Open-o-meter: 0 Product category: Hardware Contains original non-electronic hardware: Contains original electronic hardware: Contains original software: |

Inhaltsverzeichnis
Description
Main Page
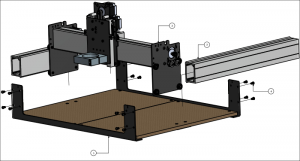
This is the 3rd official version of the Shapeoko desktop CNC machine. With over 3 years of user feedback, experience, and improvements ranging from easier assembly to better software options, this is the best Shapeoko we've ever made. Period.
Contents
Shapeoko
An Open Hardware project in Dixon, IL by Edward Ford
Ayo If you're looking at this project, you probably think a low cost simple desktop CNC machine is as cool as we do. Sweet. It's always nice to meet like minded people
CNC is an acronym for Computer Numerical Control. Growing out of the sorts of numerical controls used to control looms and mills manufacturing helicopter blades (see ), affordable computers and clever programming (see ) and opensource have made CNC affordable at a hobby-level.
The Shapeoko is a 3-axis CNC machine kit. It is intended to provide basic functionality while being simple to understand, assemble, and operate all this at the best possible value. The stock configuration forgoes many features that are standard in more expensive machines (but many can be added as ). This imposes limitations that the user has to work around. Despite this, or maybe because of this, many people with no prior experience with CNC, woodworking, or machining have successfully assembled and operated Shapeoko machines. Like most things in life, what you get out of it reflects the effort, preparation and patience you are willing to exert. We strongly suggest that you start by assembling and using the machine in its stock configuration. This makes troubleshooting via e-mail and the forums easier; more importantly, it provides you with valuable experience for implementing any planned upgrades.
Have a look around the DIY CNC scene and you will notice the lack of simple, low cost, straight forward build options. We want to fix that. For the last four years we have been designing, redesigning, and building what we hope to be a CNC machine that anyone can build for the lowest possible price (about $300 in 2012 3 with a bit of patience and luck in sourcing parts and w/o two upgrades (dual-motors and double X-axis) which are now standard, a full kit (sans spindle) for the much improved Shapeoko 3 is currently $1,099). Did I mention that cost even includes the electronics to run the machine? Unlike other projects where you can blow a significant budget on just the frame and maybe motors, ShapeOko includes everything you will need to turn your ideas from just a crazy thought into a tangible item.
If nothing else, this project is open. Nobody wants to get locked into some proprietary platform, and nobody wants to spend their money on a machine just to learn they will need to spend another $500 on software to run it. With that in mind, we built the entire process around open source components. From and software to the CNC controller; every step has an open source solution. Did we mention the entire project itself is open source? Every nut, every bolt, every belt, fully documented with part numbers and vendor list. Do with it as you please
What makes this different? One of the frustrations we had with other designs was the fact that you had to visit a lot of different vendors in order to get all the pieces. We didn't like that. Plus, some projects didn't have a central "released" build, which made it difficult to determine if what you were building was actually what you were expecting to build.
All of that resulted in the following design goals:
- 1 standard design
- lowest possible total cost (originally $300)
- Maximum of 3 vendors
So, how are we doing on the goals?
- 1 standard design - So far, so good. There are documented upgrades, but a single design for each version.
- lowest possible total cost - while there are less expensive machines, as of this writing the Shapeoko seems to be at the sweet point of price and capability and expandability, and we believe represents the best possible value for a hobby CNC.
- Maximum of 3 vendors - as of this writing it's possible to purchase a full kit from single vendors, (the manufacturer) or (which uses a , and offers the option of a ) (note that it requires a code to be supported by Carbide Motion). See the page (as well as the ) and pages for more information and other options.
In the News
1.71 (scale of 0 2) on user satisfaction survey:
How to determine if a Shapeoko is right for you
Please look through the wiki, esp. the Project links and see if the machine is capable of the sort of projects which you wish to make. Check the page to see if it can cut the materials necessary for your projects.
Research CAD/CAM workflows until you are confident of a suitable technique for getting from: idea -> design on computer screen -> G-code file -> stock clamped, machine zeroed, file sent -> finished part.
Reviews
First Project
The prototypical first job for a Shapeoko is to cut a coaster doing this using Carbide Create: (see below for the official tutorial)
3D Machine Simulation
Forum user Grblgru has created a 3 dimensional software simulation of a Shapeoko (which can be extended to mimic other machines). This will allow one to do an end-to-end simulation of a production workflow, including (virtual) machining operations. In addition, it's a great way to while away time while waiting for a machine to be delivered.
please note that that link takes one to the first page of the discussion. There is additional information (and newer versions) in later posts.
List of Publicly Accessible Machines
The following groups / organizations have Shapeokos (and/or Nomads) and are open to the public (or to guests of members):
- Shapeoko
- 10BitWorks, San Antonio, TX
- ATX Hackerspace, Austin, TX
- Bozeman Makerspace, Bozeman, MT
- MidSouthMakers, Memphis, TN
- MobileMakerspace, Mobile, AL
- Splatspace, Durham, NC
- Staten Island Makerspace, New York City, New York
- Sioux Falls, SD
- Nomad
- Nomad 883 Pro
Descriptions of Learning to Use a Machine
To a great degree, this wiki represents the community's experiences of what it's like to learn:
- how to assemble and calibrate a machine
- how to design and draw up projects
- how to source, prepare, clamp, and zero stock and determine optimal feeds and speeds
- how to use the machine, zero and fine tune it
One user, JohnP, wrote up an excellent summary of his experiences on the forums: .
Another user, Julien Heyman (Julien on the Carbide 3D forums) did an extensive writeup on his purchase and usage of a Shapeoko 3 which cannot be recommended highly enough:
Overview
This wiki documents the Shapeoko, a CNC machine / kit project. The wiki is navigated by using the sidebar to the left. The overall structure and some of the more interesting pages:
Please be certain to start with the and to use the when using the machine. There is also an which should be consulted in the event of any questions. The PDF may be helpful as well.
First, you will assemble and/or set up your machine. Official instructions are currently available as:
Also see and (see the and pages if there are any difficulties).
Third, the machine, and if necessary it.
Lastly use the machine to make of suitable (clamped in place w/ a suitable technique) using your choice of (one tool for this is ). Note that one should test and prove out the machine, the CAD/CAM file and feeds and speeds systematically. Start by cutting in foam or some similar material, progress to making cuts in scrap or inexpensive materials. Only commit to using expensive materials when confident of everything working correctly.
The classic first project is a coaster:
c.f.,
Note that cutting requires on to define "toolpaths" which they machine will follow. As the name implies, these are paths of motion which the machine will follow so as to move the tool where it should cut. Usually defined in a DXF or SVG file (see they must be vector / outline descriptions of geometry (merely placing a pixel image in a vector editor and re-saving won't work). Pixel images may be used directly using tools such as or which support that, otherwise they must be auto-traced or re-drawn as discussed on the page.
About these pages
- Overview of different parts and components, additional information on: and
- Additional Build Information , and
- Using Your Machine
- Gallery
- Additional Resources
Much information about the original machines is still present here and has been archived (see Shapeoko 2 and ShapeOko 1 Build Instructions in the sidebar) and these pages serve as a catch-all for anything not covered at (the official company page and ), the and , and hosted on ) and the and .
ShapeOko is now made in partnership w/ which also makes the , a smaller, enclosed machine w/ a custom spindle. See and
+ General Reviews 
Public cad repository for non-electronic hardware
Public cad repository for electronic hardware
Assembly instructions
Bill of materials
Link github
Link grabcad
Link media wiki
