Build Modular Workbench Storage with French Cleats Make:
|
|
Build Modular Workbench Storage with French Cleats Make: Basic Data Category: Projects URL (first publication): https://makezine.com/projects/french-cleat-workbench-storage/
no no
Other
Design files are in original format: No Free redistribution is allowed licence: No
|
Description
Build Modular Workbench Storage with French Cleats
- By
- Time Required: 1–3 Hours
- Difficulty: Easy
French cleats are a great modular storage system that allow you to rearrange objects without hunting for studs in the wall every time you need to hang something.
So what is a French cleat? It’s simply a board that has been cut with an angle (I used 45°) on its long side and attached to a surface with the angle sloping in. The other half of the board that’s been cut is then attached to something, be it a bracket for tool storage or the back of a cabinet for mounting on the wall. Yeah that’s right… you can hang cabinets with French cleats
This system is really handy for small shops because as your needs change or new tools are acquired, you don’t have to spend hours finding studs to rehang cabinets, shelves, or whatever else you keep on your walls. It’s gonna happen, trust me.
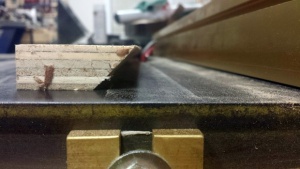
Cut Cleats
For my project, I took a piece of 3/4″ plywood that was 5″ wide and ripped it on a 45° with one half being about 3″ wide and the other roughly 2.5″ wide at the widest points. Now, if you want your life to be a little easier, just rip both pieces to be the same size. Also, the length of these rails is determined by your needs. If you have a 2′ section that you’re wanting to hang French cleats on, then your board would be 2′. See how that works?
Mount Cleat On Wall
The piece that’s 3″ wide is then mounted to either the wall, or in this case, a sheet of plywood. Mount the rail with the 45° angle sloping towards the wall/plywood as shown below.
Be sure to find those studs The ones in the wall that is…
Attach Cleat to Bracket/Cabinet
Now take the 2.5″ cleat and attach it to a bracket or whatever it is that you’re wanting to hang. The orientation of the cleat should reflect what’s shown in the illustration above.
The cleat’s placement on the item you wish to hang is of some importance. Generally when using just one cleat to hang your items from, you want it to be located towards the top of your bracket, cabinet, or whatever you’re hanging up.
Customizing hangers
Let’s build a couple hangers
The first one is for storing a tool that cuts the center out of a wooden bowl in one solid hunk First, I grab the three knives and arrange them how I’d like them to be stored and decide that I’d like to store them in a vertical orientation. In the photo below, I’m simply tracing around the knives onto a piece of 3/4″ plywood.
With the knives traced, I cut out the inside on the bandsaw and tested the fit. This needs to be just snug enough that the knives won’t wobble around too much, but will still slide freely.
Now, with another block of plywood that’s the same size as the last, I draw a rectangle that corresponds with the previous cut. I then head over to the bandsaw and again cut out the center.
I glue up the two pieces and throw in a couple brads to hold everything together while the glue dries.
I now cut two pieces of ¼” luan for the front and back and again glue and brad the piece of luan in place.
Before gluing on the front, I insert the knives and temporarily clamp the front piece of luan in place to see how everything fits. Good thing I discovered that the knives weren’t held securely enough and would lean forward when in the vertical position. No good… so I added a small spacer as shown below.
Now with everything as it should be, I used glue and brads to attach the remaining piece of luan. It is shorter in the front to allow the knives to slightly pivot as they are removed.
Now onto mounting this bad boy to the French cleat Very scientifically, I hold the piece and cleat in position against the rail and mark where the cleat should be attached to by tool holder. I could have just measured about 3-¼” from the bottom of my tool holder and mounted the cleat accordingly, but I wanted to maximize my usable space around these knives.
I used two #8×1.5″ drywall screws to attach the cleat to the tool holder. Here we are all wrapped up with this one Like a boss
The above process is simply a guide and can certainly be modified as needed for whatever specific needs you may have.
Parts
- ¾” plywood
- Screws 1 ¼” - 1 ½” drywall or wood screws
Tools
- Table Saw or Circular Saw
- Power Drill
- Screw Driver (or bit for power drill)
- Drill Bit for screw pilot holes
Advertisement
Advertisement
Advertisement
Mike is a 9 to 5er working as a mechanical designer to support his family. His recreation and passion is to create. Mike has been woodworking since the early 2000’s and his fields of specialty lie in guitar building, furniture making, and woodturning.
Advertisement
+ General Reviews 
