College Bike Trunk Make:
|
|
College Bike Trunk Make: Basic Data Category: Projects URL (first publication): https://makezine.com/projects/make-23/college-bike-trunk-2/
no no
Other
Design files are in original format: No Free redistribution is allowed licence: No
|

Inhaltsverzeichnis
Description
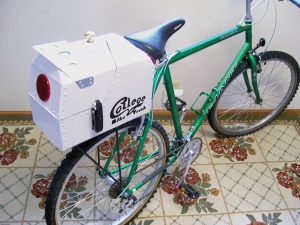
College Bike Trunk
Make a lockable carry-all box from sheet metal.
- By
- Time Required: 2 weekends
- Difficulty: Moderate
Growing up, I would often visit my grandparents in Dinkytown, the southeast Minneapolis neighborhood near the University of Minnesota that was named after the freshman cap worn there a century ago. I remember seeing students on ten-speeds carrying their stuff in milk crates that they strapped to the rear rack with bungee cords.
Inspired by that image, I wanted something better and more secure. Car drivers can lock things up while running errands, so why should cyclists have to carry everything around with them?
So I designed this sheet metal bike trunk. I sized it to hold two 1-gallon jugs of milk with a little room to spare. Its top angles away from the seat like a saddle does, so nothing rubs against the rider. And its 2 latches will accept 2 padlocks to secure the contents against casual theft.
NOTE: If you like, you can prototype the project in cardboard before going to metal. For more advice on working with sheet metal, see my Retro Racer project (, page 97) and Mister Jalopy’s “Q&D: Holes, Rivets, and Bent Metal” (, page 110).
Parts
- Piano hinge, 7" (1)
- Inner tube, rubber (1) for bike tire, used
- Draw hasps, 4", black (2)
- Pop rivets, aluminum, 3/16" (10) Include matching backup washers
- Pop rivets, aluminum, 1/8" (100) Include matching backup washers matching backup washers
- Steel sheet, 20 gauge, at least 18”x28” each (2)
- Aluminum sheet, 12 gauge, at least 14”x7-1/4” (1) I used an old stop sign.
- Metal sheet, shiny, 15-gauge aluminum or 20-gauge stainless steel, 6"x12" (1) optional
- Brass knob (1)
- Pipe hanging clips, vinyl coated, 5/16" (4)
- Silicone glue, Clear (1)
- Craft glue, E-6000 (1) Don't use cyanoacrylate (crazy/super) glue.
- Spray paint, Rust-Oleum Painter’s Touch (1) You need a white primer, flat black, and flat white
- Glazing and spot putty, Bondo/Dynatron (1) from an auto parts store
- Rear reflector, Adhesive, 3" (1)
- Bolts, 1/4-20 x 3/4", with locknuts and washers (5)
- Bike rack, rear (1) I used a 27"/700cm rack
- Tape, double-sided and masking (1)
- Padlocks, small, 1½" shackle, keyed alike (2)
Tools
- Bending brake
- C-clamp
- Center punch
- Combination square
- Dremel rotary tool
- Drill with bits 1/8", 3/16", 1/4"
- Hammer
- Marker
- Metal files
- Pop rivet tool
- Sandpaper
- Scissors
- Tinsnips
- Wax paper
- Wood blocks
- X-Acto knife
Advertisement
Advertisement
Advertisement
Steps
Advertisement
- Download the , and print them at full size. Cut them out, and tape them onto the sheet metal using double-sided tape, or else cut holes in the templates and stick masking tape over the holes.
- Trace around the edge of each template with a fine permanent marker, and use tinsnips to cut out pieces A1/A2, B1, C1/C2, and D1. Don’t cut apart A1 and A2 or C1 and C2 yet. After cutting, pound flat any uneven edges with a hammer and wood block, and file smooth the sharp edges.
- I used shiny aluminum for the “chrome” tail ornament E1, but stainless would also work. I’ve found that aluminum doesn’t pound back flat well, so I cut it out with a Dremel and cutting wheel.
- For the base piece (not shown on the templates) cut a 14"x7-1/4" rectangle out of thicker aluminum.
- Drill 1/8" holes around the perimeter of body piece A1/A2 as shown on the template. For the 8 oval cutouts in E1, drill holes inside each, then work the shapes out with a file.
- Cut the inner tube lengthwise, wash it thoroughly with soap and water, and let it dry overnight.
- Lay the trunk lip piece D1 on wax paper, then coat it with E-6000 glue. Cover it fully with flat pieces of inner tube, then more wax paper. Clamp it all flat using C-clamps and scrap plywood.
- Let the glue dry for 3 days or more, then remove the clamps and wood, and peel off the wax paper. Trim any excess rubber around the edges of the metal with an X-Acto knife.
- Using the sheet metal brake, bend down the 2 middle lines of piece A1/A2 at 42°, then bend the bottom tabs inward at 90°.
- Similarly bend B1, C1/C2, D1, and E1 along the lines indicated on the templates.
- NOTE: Front cap B1 and end cap C1/C2 look very similar; don’t mix them up.
- Temporarily assemble end caps B1 and C1/C2 to the body A1/A2, clamping them together at the bottom. Fit them at the top and re-drill through one 1/8" hole on each bend plane in A1/A2. Pop-rivet through these holes to hold the pieces in place temporarily, then drill through all the remaining holes.
- Drill out the pop-rivets using the same 1/8" bit, pull everything apart, and file down any burrs.
- Now that everything lines up, put it back together again. Glob the Dynatron putty on the tabs of B1 and C1/C2 and rivet the pieces to A1/A2 through all the holes.
- Wipe the excess putty with a rag and let it dry.
- Cut templates A1/A2 and C1/C2 apart as indicated, tape them in place on the trunk, and trace them with a marker. Then use a Dremel tool to cut out the door A2 and the hinge joint between C1 and C2.
- Cut a 1/4" gap between C1 and C2 for the hinge, then clamp on the hinge, mark and drill through its mounting holes, and pop-rivet it in place.
- Use a Dremel to widen the gap between door A2 and trunk A1 to 1/8".
- Bend the trunk lip D1 to fit inside A1, level or angled just slightly downward. Clamp it in place, then drill and rivet in place, backing the rivets with washers.
- Drill the tabs around the underside of the trunk with 1/8” holes 1" apart. Fit the trunk over the base, then mark and drill matching holes in the aluminum.
- Put a bead of silicone glue between the panels over the holes, and rivet the base in place.
- Wipe excess silicone with a rag and let dry.
- Place the 2 hasps, one on each side. Mark and drill through the mounting holes, then rivet the hasps in place using the larger, 3/16" bit and rivets, reinforced with washers.
- Drill a hole for the brass knob on top of the door. For decorative tailpiece E1, position it on the door and mark and drill 1/8” holes in both pieces, but don’t rivet it on yet.
- Fit the 5/16" pipe clips around the tubing on either side of your bike rack's platform. Flip the trunk upside down and center the rack on the base.
- Mark the clip mounting hole positions and drill 4 corresponding 1/4" holes in the base, plus an extra hole centered in back where the rack already has a hole.
- Paint the inside of the trunk flat black.
- Sand down the putty on the exterior, then paint it with primer and white paint (to keep cool in the sun).
- I cut “College Bike Trunk” emblems out of black tape and stuck them to the sides.
- Finally, pop-rivet the tail on, and stick the red reflector on the back.
- Install your new bike trunk on the rack using the 1/4-20 bolts.
- To lock the trunk, use padlocks with shackles 1-1/2” long, one on each latch.
- Now you’re done. It’s time to celebrate like a college student — go to the store, and pick up some beer
Conclusion
This project first appeared in , page 135.
Frank E. Yost is an artist from Minnesota with interests like biking, drawing, woodcarving, bronze casting, welding, and R/C cars. He is planning to release a new book on Kindle soon called The Giant Water Tower.
Advertisement
+ General Reviews 
