Laser-Cut Box Loom Make:
|
|
Laser-Cut Box Loom Make: Basic Data Category: Projects URL (first publication): https://makezine.com/projects/laser-cut-box-loom/
no no
Other
Design files are in original format: No Free redistribution is allowed licence: No
|

Inhaltsverzeichnis
Description
Laser-Cut Box Loom
- By
- Time Required: 3-8 Hours
- Difficulty: Easy
- Price: $15-$60
My wife showed me some pictures of old Norwegian box looms and asked me to make something similar. The reason being that a back-strap loom, worn on the body, can be impractical with small children running around. I’m not much of a woodworker, so I decided to design something that could be laser cut and then assembled with a minimum of work.
This box loom is designed for use with a rigid heddle or for card weaving. It can be used on a table or on your lap, and the work can be dropped at a moment’s notice when something else (kids, pets, etc.) requires attention right now.
The cloth and warp beams are held in slots rather than holes. This makes construction easier, and, as a bonus, you can remove and set aside an unfinished project if something more interesting comes along. Simply release the tension, carefully take out the beams, roll up your project, and secure it with rubber bands.
If you build more than one loom, the recesses on the lower edge allow for easy stacking.
Once you have the laser-cut parts, the rest of the loom can be made with the most basic of woodworking tools. All measurements are in millimeters, but none are so critical that they can’t just be eyeballed.
1. Laser-cut the pieces
On the cutting plan, the black lines must be cut, the red lines etched. Import the file in millimeters, not inches. The clearance for the finger joints is 0mm.
The kerf from the laser should be sufficient for these joints. If you were to use a CNC router instead of a laser cutter, you may want to widen the joints or play with the thickness of your bit.
All parts are nested in a 500mm×500mm area. If you use solid wood rather than ply, keep in mind the wood grain and move the pieces around as needed.
2. Shape the panels
The bottom, front, and back panels will need some shaping. All edges that need shaping have an etched line, indicating where the beveled edge starts. All sides with an etched line will end up on the outside of the loom (Figure A).
Clamp each panel to a work surface and remove material outside this line. I prefer to use a wood plane for this. A rasp or coarse sandpaper will work as well.
3. Glue the loom body
First, do a dry fit to see how the panels go together and where the glue actually needs to be. Spread a thin layer of carpenter’s glue on one side of all the panel joints, assemble, and clamp as indicated in Figure B, using just enough pressure to keep the pieces in place. Set to dry on a plastic bag.
Take a step back and admire your work. If it appears to be crooked or put together wrong, adjust or take it apart and redo. If there’s any glue squeeze-out, wait until it becomes rubbery and scratch it off.
Put a drop of glue in the holes for the 8mm pins and push in the pins in a twisting motion, holding a finger on the back of the hole to prevent pushing out the glue. Spread some glue in the recesses for the breast beam and place the 24cm dowel. No clamp is needed here.
Once the glue has set, use sandpaper to round off the edges to your liking. I prefer to sand down the protruding bits of the finger joints, but that’s mainly cosmetic.
4. Make warp and cloth beams
Make a pair of these (Figure C), or more if you want interchangeable sets. The cutting plan has enough parts for 2 pair.
To drill the holes (marked in red), clamp the 29cm dowels to a sacrificial piece of wood. Don’t worry if the holes aren’t very straight. If you wish, you can also file a small groove around the ends of the beams for
the hair ties to sit in.
Test-fit before gluing the beams; they should easily turn in the slots with a small amount of play. But don’t leave them in the loom to dry, as they might get stuck there.
For the apron strings, loop a 75cm string through the holes as shown in Figure D. Make a knot only in the ends. This way the length of the loops around the apron rods can be equalized afterward.
5. Final assembly
Place the warp beam and cloth beam in the slots (Figure E). Place the ratchets on their pins and secure them with the small rings. Don’t glue these; if the small rings are too loose, you can thicken the pins by wrapping tape, thread, or cling film around them. The ratchets should move freely around the pins. If they don’t work to your satisfaction, put some extra 8mm dowels in the unused holes and use these for the ratchets.
The hair ties keep the beams in place while warping the loom. Remove them after warping, or leave them, whatever works best.
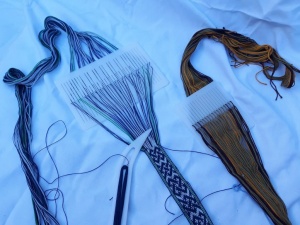
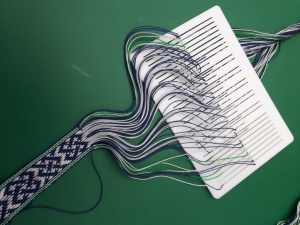
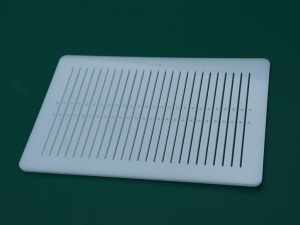
I also made a heddle from 3mm Delrin (POM) plastic. Laser cutting POM leaves very smooth edges that won’t fray your warp.
Parts
- Download the plans and DXF files for cutting at . I used poplar; most types of solid or plywood will work. You can substitute 10mm or ½" plywood; you’ll just have to adjust the beveled edges.
- Wood dowels, 22mm diameter: 24cm long (1) and 29cm long (2 or 4)
- Wood dowels, 8mm dia., 40mm long (4)
- Strings, 75cm long (2)
- Hair ties (4)
- Wood glue (PVA), white or yellow
- Teflon tape, thread, or cling film (optional)
- Yarn, shuttle, and a rigid heddle or weaving cards for weaving
- Pencils (2) or similar thin rods about 8mm dia. and 21cm long, for apron rods
Tools
- Laser cutter or CNC router
- Wood saw to cut dowels
- Clamps (2) at least 24cm opening
- Drill with 3mm drill bit
- Plane or wood rasp
- Sandpaper or sander
- Plastic bag
- File (optional)
Advertisement
Advertisement
Advertisement
Matthijs Witsenburg, 37, formerly a blacksmith and jouster, now designs automated greenhouses and theatrical equipment. He lives in the Netherlands with his family and two guinea pigs.
Advertisement
+ General Reviews 
