OpenBikeWorks
Aus Open Source Ecology (OSE) Germany - Entwicklungsplattform
|
|
OpenBikeWorks Basic Data Category: Projects URL (first publication): http://openbikeworks.blogspot.com/
no no
Other
Design files are in original format: No Free redistribution is allowed licence: No
|
Inhaltsverzeichnis
Description
Designing and building low cost DIY open source cargo bikes
N55.dk
Tuesday, March 27, 2012
Today we finally got the last parts transported to the workshop at and started building. The sun was shining, everything worked nicely, and to the sound of , and , the two first small parts of the frame took form. This was a very nice day.
Søren cuts the first piece of aluminium. It was nice to move on form the digital models to handling the materials in real life.
Tuesday, February 21, 2012
This tuesday we have been working on some other approaches to our cargo bike. In the foggy haze of millimeter measurements, multiple sketches and various ways of construction solutions we decided that it couldn't harm to try of alternative solutions.
So why not take advantage of the old and proven design of a regular bike frame and then mix it with our design of the cargo space. This would make it a lot easier to build in the rear wheel, seat post and handlebar. Making a strong connection between the two very different parts seemed like a fun challenge. And it is still without any welding
Here is some samples:
So why not take advantage of the old and proven design of a regular bike frame and then mix it with our design of the cargo space. This would make it a lot easier to build in the rear wheel, seat post and handlebar. Making a strong connection between the two very different parts seemed like a fun challenge. And it is still without any welding
Tuesday, January 24, 2012
I've spent most of today adjusting the 3D model. It's still very much a work in progress, but it is getting sharper.
One of the main challenges is the mid section, where the cargo box narrows in to meet the rear frame. This is where the frame will be subject to the most stress, and since I'm not an engineer it'll be interesting to see if my guesses turn out to be right. In general I'll rather make it a bit too weak and have to strengthen it, than over-engineering it and never know.
I'm not sure about this new solution, but I'll sleep on it.
Another focus point has been the upper rear frame with the saddle, steering and handlebar. I've refined it a bit, but with this construction method it'll be hard to make it very elegant.
Here's how it looks currently. Note that the front hub is an old version. As to the rear hub and the crank box, we haven't bothered to model them as we will simply use the proven designs from the.
Recently, our efforts have been hampered by such things as Christmas, work, travels and unpleasant deadlines. Still, we have managed to move forward.
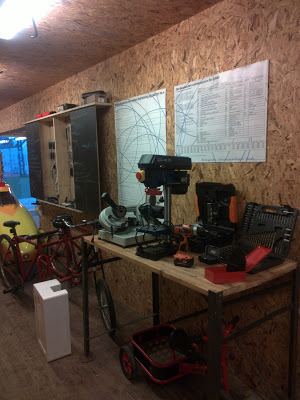
First of all, I put the power tools that we bought on my trusty Short John and took them to the workshop at .
There I assembled the drill press and the band saw. The tools belong to the , but were bought primarily for our project. With the tools ready we can get started soon.
First of all, I put the power tools that we bought on my trusty Short John and took them to the workshop at .
There I assembled the drill press and the band saw. The tools belong to the , but were bought primarily for our project. With the tools ready we can get started soon.
Before we started the project, we did some pretty thorough googling, but were unable to find any center-hub-steering cargo bikes. Now, within the last month we have found no less than three of them. It is a bit of a bummer not being first, but we'll just have to be cheaper, lighter, faster, stronger, all round nicer and easier to build than the competition.
Here are the bikes we found:
has created a beautiful bike, featuring a hub design related to what we are designing:
More in line with our DIY approach, but still requiring specialist skills, is the . The front hub and wheel is that of an .
Last is a bike with the oddly familiar name . Like the Sports Utility Bike it has a mono fork-like design. It also has a modular construction, which is related to our way of building, except this seems to require quite a lot of welding.
Here are the bikes we found:
has created a beautiful bike, featuring a hub design related to what we are designing:
01 Cargo by Elian Cycles
The design and manufacture however is very much a contrast to ours. This is professional craftsmanship, requiring high levels of expertise, while our project follows a 'for dummies, by dummies' approach. Hopefully the prize tag of our bike will also be quite different. The 01 Cargo is listed as costing 3.245 euro. ($ 4.220 / 24.130 dkk)More in line with our DIY approach, but still requiring specialist skills, is the . The front hub and wheel is that of an .
The Sports Utility Bike
Last is a bike with the oddly familiar name . Like the Sports Utility Bike it has a mono fork-like design. It also has a modular construction, which is related to our way of building, except this seems to require quite a lot of welding.
The OpenCargoBike
Tuesday, December 13, 2011
Today we are tired and content after our first trip to get materials and tools.
In the morning we took measurements on the 3D-model. It added up like this:
ca. 24 meters of aluminum
ca. 100 bolts
ca. 100 nuts
After that Andreas went and borrowed a cargo bike from the local . They lend out the bikes for free. You do however have to leave 500 dkk ($90) in security, which will be repaid when the bike is returned unharmed. It's a great deal offered by the local in collaboration with Irma.
Then we were off to Glostrup, about 10 km west of Copenhagen. It was nice to get some fresh air, although it was a cold and rainy day. See .
In Glostrup we passed to pick up some tools for the workshop. We got a small , a and a heap of drills and bits.
After that we visited the friendly guys at . There we bought 24 meters of 25x25x2 mm aluminum square extrusions, weighing around 12 kgs and costing a 1.162 dkk ($207).
We secured it to the bike with strips and headed home. If anyone wants to do the same, some rope would probably be a better idea. Also remember to tie the extrusions to the bike in a way that they do not scratch the frame. Also remember that Metalcentret accepts cash only.
Sunday, December 11, 2011
Last week the HubJohn took its first shaky steps into physical reality. It included a couple of stumbles.
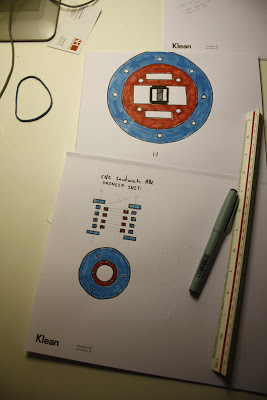
Setbacks included Søren running into a tight dealine at , forcing us to postpone our shopping trip to . Secondly the nice man at revealed that the bearings we'd hoped to use for the front hub steering mechanism cost 1300 dkk / $230 a piece, which is about what we hope to pay for the entire frame. In order to make any sense the hub must be both cheap and easy to build, so it was back to the drawing board. We are now considering both off-the-shelf car-components and a CNC cut bolt-together sandwich assembly with roller bearings. Concept sketches for the sandwich are shown below. Let's see what happens when these new ideas hit reality.
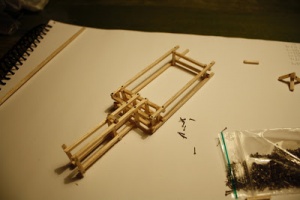
Since we were not able to get the aluminum for the full scale bike this week, I picked up some balsa wood at the local , which Søren turned into a 1:100 scale model of the lower frame. Balsa is a very soft and bendy wood, but the model proved to be nice and rigid. This seems like a good sign of the strenght of the assembly method that we are using.
On tuesday we'll be at it again:)
Setbacks included Søren running into a tight dealine at , forcing us to postpone our shopping trip to . Secondly the nice man at revealed that the bearings we'd hoped to use for the front hub steering mechanism cost 1300 dkk / $230 a piece, which is about what we hope to pay for the entire frame. In order to make any sense the hub must be both cheap and easy to build, so it was back to the drawing board. We are now considering both off-the-shelf car-components and a CNC cut bolt-together sandwich assembly with roller bearings. Concept sketches for the sandwich are shown below. Let's see what happens when these new ideas hit reality.
Since we were not able to get the aluminum for the full scale bike this week, I picked up some balsa wood at the local , which Søren turned into a 1:100 scale model of the lower frame. Balsa is a very soft and bendy wood, but the model proved to be nice and rigid. This seems like a good sign of the strenght of the assembly method that we are using.
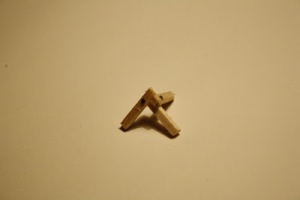
Czech Hegehog
On tuesday we'll be at it again:)
Subscribe to:
Inspired by and based on the XYZ SPACEFRAME VEHICLES by N55 in collaboration with Till Wolfer
Supported by:
Subscribe
Posts
Posts
+ General Reviews 
