Sidecar for Bicycle Make:
|
|
Sidecar for Bicycle Make: Basic Data Category: Projects URL (first publication): https://makezine.com/projects/sidecar-for-bicycle/
no no
Other
Design files are in original format: No Free redistribution is allowed licence: No
|
Inhaltsverzeichnis
Description
Sidecar for Bicycle
Build this simple design for a sidecar to attach to your bike.
- By
- Time Required: 1–3 Hours
- Difficulty: Moderate
In this case, it’s attached to my electric bike, but it will also work for a normal bicycle as well.
You will need:
- 1 bicycle
- 1 rear triangle of a bicycle with the same wheel size as your bike. I used a hacksaw to cut out this triangle from a bike I found in the dump truck.
- 2 similar cargo racks bolted to both bike and triangle.
- about 6-7 square feet of 1/2″ Baltic Birch plywood.
Advertisement
Advertisement
Advertisement
Steps
Advertisement
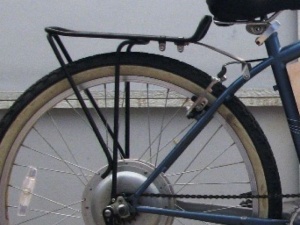
You'll need to buy a couple of decent-quality cargo racks, the kind that has 3 or 4 mounting points. It helps if they are the same model/brand.
- One of the racks will be mounted to your bike. This particular bicycle is electric-powered, but a regular bicycle will work just fine.
- The second rack will be mounted on the rear triangle of a donor bicycle. The rear triangle is cut out from the frame with a hacksaw.
- The sidecar is essentially made by connecting the two cargo racks together.
The top connecting piece is made from good-quality Baltic Birch, 1/2" thick. I used a handsaw to cut out the square opening, which was then discarded.
Two wings, also made from the same birch plywood, are then cut out and all three pieces are connected via piano hinges.
The wing pieces are then bolted securely to the top of the cargo racks.
A crossbar, also from birch ply, is then connected to the lower part of the cargo racks.
The crossbar is bolted on using a pair of these handy clamps. This one has a 1/2" capacity.
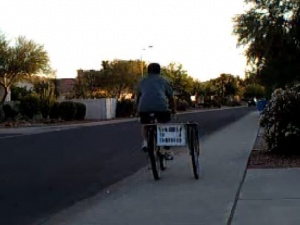
Here is the finished product, minus the milk crate I used to carry things around.
- The finished product. Here are a couple of YouTube videos:
- shows the finished product.
- shows the bike rolling. Note the milk crate; very handy.
Advertisement
+ General Reviews 
