The Solar Funnel Cooker -- Low-Tech Lab
|
|
The Solar Funnel Cooker -- Low-Tech Lab Basic Data Category: Projects URL (first publication): http://lowtechlab.org/wiki/The_Solar_Funnel_Cooker
no no
Other
Design files are in original format: No Free redistribution is allowed licence: No
|

Inhaltsverzeichnis
- 1 Description
- 1.1 The Solar Funnel Cooker
- 1.1.1 Description
- 1.1.2 Sommaire
- 1.1.3 Sommaire
- 1.1.4 Introduction
- 1.1.5 Étape 1 - Cut a Half-circle out of the Cardboard
- 1.1.6 Étape 2 - Form the Funnel
- 1.1.7 Étape 3 - Glue Foil to Cardboard
- 1.1.8 Étape 4 - Join side A to side B to keep the funnel together
- 1.1.9 Étape 5 - Painting the jar
- 1.1.10 Étape 6 - Final steps
- 1.1.11 Étape 7 - After Cooking
- 1.1.12 Étape 8 - Helpful Hints
- 1.1.13 Notes et références
- 1.1 The Solar Funnel Cooker
- 2 + General Reviews
Description
The Solar Funnel Cooker
- 0
Tutorial de Catégories : ,
Description
Construction of the solar funnel cooker, safe, efficient, easy to build and to use.
Construction of the solar funnel cooker, safe, efficient, easy to build and to use.
Sommaire
Sommaire
chauffage, solaire, capteur, air, solar, heating, house, maison, habitat, Lowtech4Refugees en none 0
Introduction
Very cheap, easy and efficient cooker.
Parabolic cooker can be dangerous (causing fires) and complicated to make. This cooker gave results comparable to the ones given by a "cookit" cooker and a solid wooden cooker.
Portuguese :
Spanish :
Thanks to Tom Sponheim to let us share this great technology
Matériaux
Outils
Étape 1 - Cut a Half-circle out of the Cardboard
Cut a half circle out of the cardboard, along the bottom as shown below. When the funnel is formed, this becomes a full-circle and should be wide enough to go around your cooking pot. So for a 125 mm diameter cooking pot, the radius of the half-circle is 125 mm.
Étape 2 - Form the Funnel
To form the funnel, you will bring side A towards side B, as shown in the figure. The aluminum foil must go on the INSIDE of the funnel. Do this slowly, helping the cardboard to the shape of a funnel by using one hand to form creases that radiate out from the half-circle. Work your way around the funnel, bending it in stages to form the funnel shape, until the two sides overlap and the half-circle forms a complete circle. The aluminum foil will go on the INSIDE of funnel. Open the funnel and lay it flat, "inside up", in preparation for the next step.
Étape 3 - Glue Foil to Cardboard
Apply glue or adhesive to the top (inner) surface of the cardboard, then quickly apply the aluminum foil on top of the glue, to affix the foil to the cardboard. Make sure the shiniest side of the foil is on top, since this becomes your reflective surface in the Funnel. I like to put just enough glue for one width of foil, so that the glue stays moist while the foil is applied. I also overlap strips of foil by about 2 cm. Try to smooth out the aluminum foil as much as you reasonably can, but small wrinkles won't make much difference.
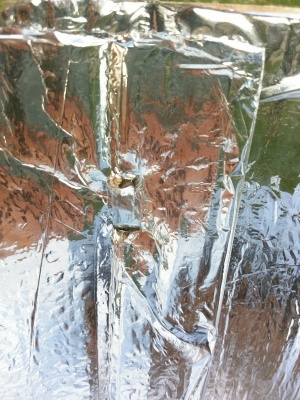
Étape 4 - Join side A to side B to keep the funnel together
The easiest way to do this is to punch three holes in the cardboard that line up on side A and side B (see figure). Then put a metal brad through each hole and fasten by pulling apart the metal tines. Or you can use a nut-and-bolt to secure the two sides (A & B) together.
Be creative here with what you have available. For example, by putting two holes about a thumb-width apart, you can put a string, twine, small rope, wire or twist-tie in one hole and out the other, and tie together. Here we used wire mae out of a plastic bottle as described in this tutorial :
When A and B are connected together, you will have a "funnel with two wings". The wings could be cut off, but these help to gather more sunlight, so I leave them on.
Tape or glue a piece of aluminum foil across the hole at the bottom of the funnel, with shiny side in.
This completes assembly of your solar funnel cooker.
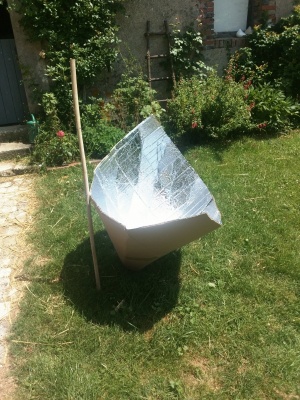
For stability, place the Funnel inside a cardboard or other box to provide support. For long-term applications, one may wish to dig a hole in the ground to hold the Funnel against strong winds
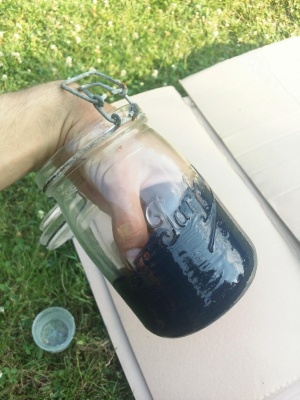
Étape 5 - Painting the jar
You must paint the jar in mat black. The darkest the better.
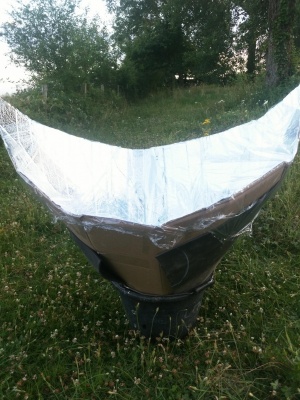
Étape 6 - Final steps
At this stage, you are ready to put food items or water into the cooking vessel or jar, and put the lid on securely. (See instructions on food cooking times, to follow.)
Place a wooden block in the INSIDE bottom of the cooking bag. Then place the cooking vessel containing the food or water on top of the wooden block, inside the bag.
Next, gather the top of the bag in your fingers and blow air into the bag, to inflate it. This will form a small "greenhouse" around the cooking vessel, to trap much of the heat inside. Close off the bag with a tight twist tie or wire. Important: the bag should not touch the sides or lid of the cooking vessel. The bag may be called a "convection shield," slowing convection-cooling due to air currents.
Place the entire bag and its contents inside the funnel near the bottom as shown in the Photographs.
Place the Solar Funnel Cooker so that it Faces the Sun
Remember: Sunlight can hurt the eyes: Please wear sunglasses when using a Solar Cooker The Funnel Cooker is designed so that the hot region is deep down inside the funnel, out of harm's way.
Put the Solar Funnel Cooker in the sun pointing towards the sun, so that it captures as much sunlight as possible. The design of the funnel allows it to collect solar energy for about an hour without needing to be re-positioned. For longer cooking times, readjust the position of the funnel to follow the sun's path.
It helps to put the Solar Funnel Cooker in front of a south-facing wall or window (in the Northern Hemisphere) to reflect additional sunlight into the funnel. A reflective wall is most important in locations farther from the equator and in winter. In the Southern Hemisphere, put the Solar Funnel Cooker in front of a North-facing wall or window to reflect additional sunlight into your cooker.
Étape 7 - After Cooking
Remember that the cooking vessel will be very hot: Use cooking pads or gloves when handling If you are heating water in a canning jar, you may notice that the water is boiling when the lid is first removed - it gets very hot
Open the plastic cooking bag by removing the twist-tie. Using gloves or a thick cloth, lift the vessel out of the bag and place it on the ground or table. Carefully open the vessel and check the food, to make sure it has finished cooking. Let the hot food cool before eating.
Étape 8 - Helpful Hints
Notes et références
, by (), Professor of Physics at Brigham Young University (BYU) and his team
30/09/2018 par . Published
Vous avez entré un nom de page invalide, avec un ou plusieurs caractères suivants :
+ General Reviews 
