Cookies helfen uns bei der Bereitstellung von Open Source Ecology (OSE) Germany - Entwicklungsplattform. Durch die Nutzung von Open Source Ecology (OSE) Germany - Entwicklungsplattform erklärst du dich damit einverstanden, dass wir Cookies speichern.

Trailer fabrication

Aus Open Source Ecology (OSE) Germany - Entwicklungsplattform
Wechseln zu:Navigation, Suche

2904.1.jpg

Trailer fabrication

Basic Data

Category: Projects

URL (first publication): https://de.slideshare.net/cbcad2010/trailer-fabrication


no

no no


Other


Design files are in original format: No

Free redistribution is allowed licence: No


Description

SlideShare verwendet Cookies, um die Funktionalität und Leistungsfähigkeit der Webseite zu verbessern und Ihnen relevante Werbung bereitzustellen. Wenn Sie diese Webseite weiter besuchen, erklären Sie sich mit der Verwendung von Cookies auf dieser Seite einverstanden. Lesen Sie bitte unsere und die .

SlideShare verwendet Cookies, um die Funktionalität und Leistungsfähigkeit der Webseite zu verbessern und Ihnen relevante Werbung bereitzustellen. Wenn Sie diese Webseite weiter besuchen, erklären Sie sich mit der Verwendung von Cookies auf dieser Seite einverstanden. Lesen Sie bitte unsere unsere und die .


Wir verwenden Ihre LinkedIn Profilangaben und Informationen zu Ihren Aktivitäten, um Anzeigen zu personalisieren und Ihnen relevantere Inhalte anzuzeigen.


Trailer fabrication
Nächste SlideShare


Wird geladen in …5


1


Dieses Dokument gefällt Ihnen? Dann am besten gleich teilen


Einbetten
Größe (px)
Ähnliche SlideShares am Ende anzeigen
WordPress-Shortcode
Link

5.486 Aufrufe

  • Teilen
  • Gefällt mir
  • Herunterladen


Veröffentlicht am 20. März 2012

Veröffentlicht in: ,


  • Gehören Sie zu den Ersten, denen das gefällt


Aufrufe
Aufrufe insgesamt
5.486
Auf SlideShare
0
Aus Einbettungen
0
Anzahl an Einbettungen
14
Aktionen
Geteilt
0
34
0
Gefällt mir
0
Einbettungen 0
Keine Einbettungen

Keine Notizen für die Folie

Trailer fabrication

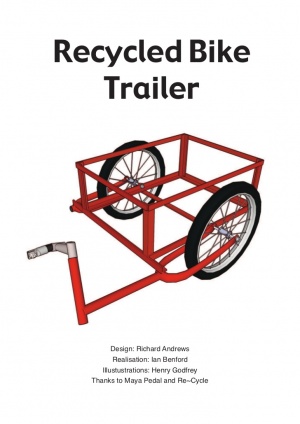
  • 1. Recycled Bike Trailer Design: Richard Andrews Realisation: Ian Benford Illustustrations: Henry Godfrey Thanks to Maya Pedal and Re~Cycle
  • IntroductionTransport of people and goods is vitally important little as possible with the safe and comfortableto any economy . Where motor vehicles are not handling of the bicycle. This is achieved byavailable, a sturdy bicycle trailer will enable mounting the trailer to the cycles rear axle (rathertraders and farmers to move goods, machinery, than the seatpost) using a specially designed,tools and materials further and faster than they flexible joint (again using bike parts).could ever be carried on foot. Fetching water isanother critical use, rather than carrying it or Please note that if you make refinements to thisusing a wheelbarrow, leading to saved time and design, we would very much like to include themcleaner / healthier living. in these documents. Please email henry@laikadesign.net with suggestions. UpdatesWe set out to design a robust, low cost, simple will be posted at www.re-cycle.orgtrailer made from globally available materials andunwanted bicycle parts. Any moderately Also; Please do not copy this file to your owntechnically minded person can succeed in this web site. Please link to it. This way, your viewersproject. will benefit from and take part in the evolution of this amazing trailer.Ideally it should be welded together using asimple arc welder, or it can be assembled usingnuts and bolts if no welder is available.It has been designed to carry heavy loads (upto 100kg) and has been refined to interfere asIngredientsOld bicycle parts: Hacksaw2x Forks of the same length. Avoid extra thick Vice (optional)mtb/bmx forks as they do not allow for attachment 10mm spannerto the frame using the standard spindles. Adjustable spanner1x Bicycle frame with standard top tube (not Drill + 3mm, 6mm and 10mm drill bitsladies style) Pliers1x Standard type stem (not A-headset) Metal FileHandlebars (aluminium racer or steel straight Arc welder (optional)bars)2x Wheels, 20" or smaller. * A pipe bender (or plumber’s spring) is a metal tube made from spiralled steel, essentially a veryTo buy: strong, tight spring. It is normally inserted into metal pipes allowing them to be bent without4m of 25mm angle-iron them collapsing. Here it is used to make a flexible150mm of 3mm wire rope joint between the bike and the trailer. it has the2 Small U-clamps crucial benefit of being flexible without expanding1x Length of pipe bender* or compressing.Metal PrimerIf you plan to bolt your trailer: Alternatives include hydaulic hose or thick guage5x 6mm bolts (50mm in length) bike lock cable.10x 6mm bolts (20mm in length)15x Nyloc nutsTools needed:
  • 1. Lay one fork onto the ground x2+ and measure the distance from the crown to the dropouts. Multiply this measurement by two and add 5cm (2”). This will be the length of your trailer. Any longer and it may be unstable when loaded.2. Cut two sections of angle- iron to the required length (given by step 1).3. Decide how wide you would like the trailer to be. Ideally it should be between 40cm (16”) and 90cm (3’). between 40cm and Cut two sections of angle- iron to your chosen length and position at the rear end and at the middle point. Tip: You may wish to design the trailer around a standard size, e.g. bread crate, or water barrel.
  • 4. The final cross section needs to be long enough to attach both forks to. Before welding or bolting, ensure that the sections are all square and that the forks are parallel with the trailer frame. parallel parallel Mark the points where the wheel axles5. will go through trailer frame and drill holes on both sides first using a 6mm bit, then widening with a 10mm bit. Its very important to get the holes centred for the wheel axles. Too low and its difficult to get the nuts on, too high and the angle iron will be weakened Now you can weld or bolt the frame together. If you plan to bolt the trailer, you can use the brake holes at the top of the forks. From your bicycle frame, cut a section that includes the top tube and the seat tube. This6. will form the towing bar. Bike frames ofen have a variety of tube diameters. If you have a selection to choose from, choose one that will snugly accomodate the fork tube and the stem. Also remove the stem and theStem handlebars.
  • 7. Cut off the right-hand fork stem and file off the rough edge. The next part is the towing bar. It needs to line up exactly with the left hand rear wheel mount. The section of frame should fit over the fork The towing bar will be welded stem giving extra in place later. strength. The stem fits into the top end of the towing bar.8. The angle and length of your towing arm will vary according 8. to the size of your wheels. Attach the wheels and place your trailer onto blocks so that it is completely level. When lining up the arm to fit onto the fork stem, so that the Min. 4” (10cm) trailer is level and the bike centred, use a felt tip pen or similar to mark the points on both parts. These can then be lined up in a more convenient position for welding or drilling.
  • 9. The joint between the trailer and the bike is made from a bicycle If no pipe bender is available, hydraulic hose or a section cut stem, two sections of handle bar from a thick cable bike lock can and a section of pipe bender. be used to make the flexible joint. Pipe bender is ideal because it An alternative to using the handle will bend in any direction, but it bar stem, is a curved section of will not stretch or compress racing handle bars. cut so that a causing the trailer to lurch back right angle is obtainable, and fit and forth. in a similar way using the flexible joint. 10. The shorter section of handlebar goes into the stem. The pipe bender should fit into handle bar sections. The longer section of handlebar is flattened at the end and drilled with a 10mm hole. It can be flattened using a vice. Steel cable is used to keep the joint together. U-bolts secure it at both ends. To strengthen the joint, weld or bolt the stem in place. Two bolts will be needed to prevent the towing arm from twisting.
  • 11. To attach the trailer, use the bolts that hold the wheel. For quick release wheels, remove the spindle and insert the attachment between the frame and the wheel. Replace the spindle and re-tighten. Tips: File all sharp edges as children will like to touch your trailer. Load the trailer with the heaviest items in the middle. You may find it convenient to add a stand to your bicycle. Avoid using inner-tubes with unusual valves. Stick with Schrader (car type) valves or use the same as fitted to the bicycle. A bolted trailer can get out of shape.Finishing: Line the trailer with whatever is available. Carry a spanner for adjustmentsPlywood is reasonable light and weather resistant. Metalmerchants sell mesh in sheets that can be welded in place. Bolted trailers need a sturdy base.Prime the metal with rust inhibiting (zinc) primer orHammerite.Warning: Car drivers do not expect bicycles to be towingtrailers Paint yours with bright colours to makeit more visible. Add lights, reflective tape or even a flag.


  • Clipboard teilen

    Link
    Öffentliche Clipboards, die diese Folie enthalten ×
    Keine öffentlichen Clipboards für diese Folie gefunden


    Anderes Clipboard auswählen

    Sie haben diese Folie bereits ins Clipboard „“ geclippt.


    Clipboard erstellen

    Sie haben Ihre erste Folie geclippt

    Durch Clippen können Sie wichtige Folien sammeln, die Sie später noch einmal ansehen möchten. Passen Sie den Namen des Clipboards an, um Ihre Clips zu speichern.
    Name*
    Beschreibung
    Sichtbarkeit
    Für andere sichtbar
    Abbrechen


    + General Reviews General Reviews


    Report this page


    CC 2019 open hardware observatory
    |
  • Impressum
  • |
  • Legal