Welding a Jig Make:
|
|
Welding a Jig Make: Basic Data Category: Projects URL (first publication): https://makezine.com/projects/welding-a-jig/
no no
Other
Design files are in original format: No Free redistribution is allowed licence: No
|
Inhaltsverzeichnis
Description
Welding a Jig
Make an invaluable tool for right-angle metal work.
- By
- Time Required: 1 hour
- Difficulty: Moderate
A joint that is not clean and tight will end up having an ugly, weak weld. Let’s make a jig, an invaluable tool that holds two chunks of metal at right angles while allowing ample room to weld tacks in the corner.
Tools
Advertisement
Advertisement
Advertisement
Steps
Advertisement
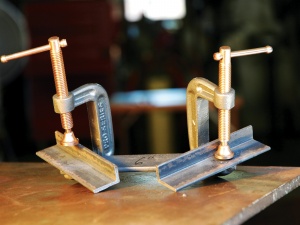
- Lay out the angle iron on the inside of the square and measure 1” from the inside corner. Clamp the cross bar behind it at about the 3” point.
- Don’t use your granddaddy’s favorite square. Anything could happen
- When welded, the diagonal cross bar will hold the angle iron at 90 degrees until California falls in the ocean.
- Make sure the clamps are right and flip it over. Weld tacks at points 1, 2, 3, and 4. Tack weld a nice, hot tack at each of the points.
- Try G-4 for about 1 second at each point. The tack welds don’t have to be gigantic, since they are just holding it together so you can remove the clamps and weld a bead. Re-trim the wire stick-out to 3/8” after each weld.
A pair of not great-looking tacks, but it will hold. The left tack is particularly puny and I should have continued welding for another half second.
- With a 3/8” stick-out, touch the wire joint between the angle and flat bar, pull the trigger, and keep at a 45° angle.
- Like laying a bead of caulk, just fill the joint with metal
- Before tacking the clamp, make sure to remove any paint from the clamp edges that will be welded. Then, tack it like you tacked the angle iron. Repeat both sides, both clamps.
Conclusion
This project first appeared in .
Mister Jalopy breaks the unbroken, repairs the irreparable, and explores the mechanical world at hooptyrides.com.
Advertisement
+ General Reviews 
